

At the professional level in any business, we are constantly told to follow the rules, and one rule of real estate marketing is to hire photographers equipped with the most advanced tools to do the shooting. On the other hand, another well-rooted principle in modern business is cutting expenses wherever possible.
That is why agents, especially when they have a tight budget or when they’re pressed for time, turn to smartphones for shooting houses. Having a reputation for high-quality cameras, iPhones are usually the preferred choice. So, in this blog, we’ll discuss using the iPhone 16 in real estate photography and provide tips on how to do it right.
A Look Into the iPhone 16 Camera Features
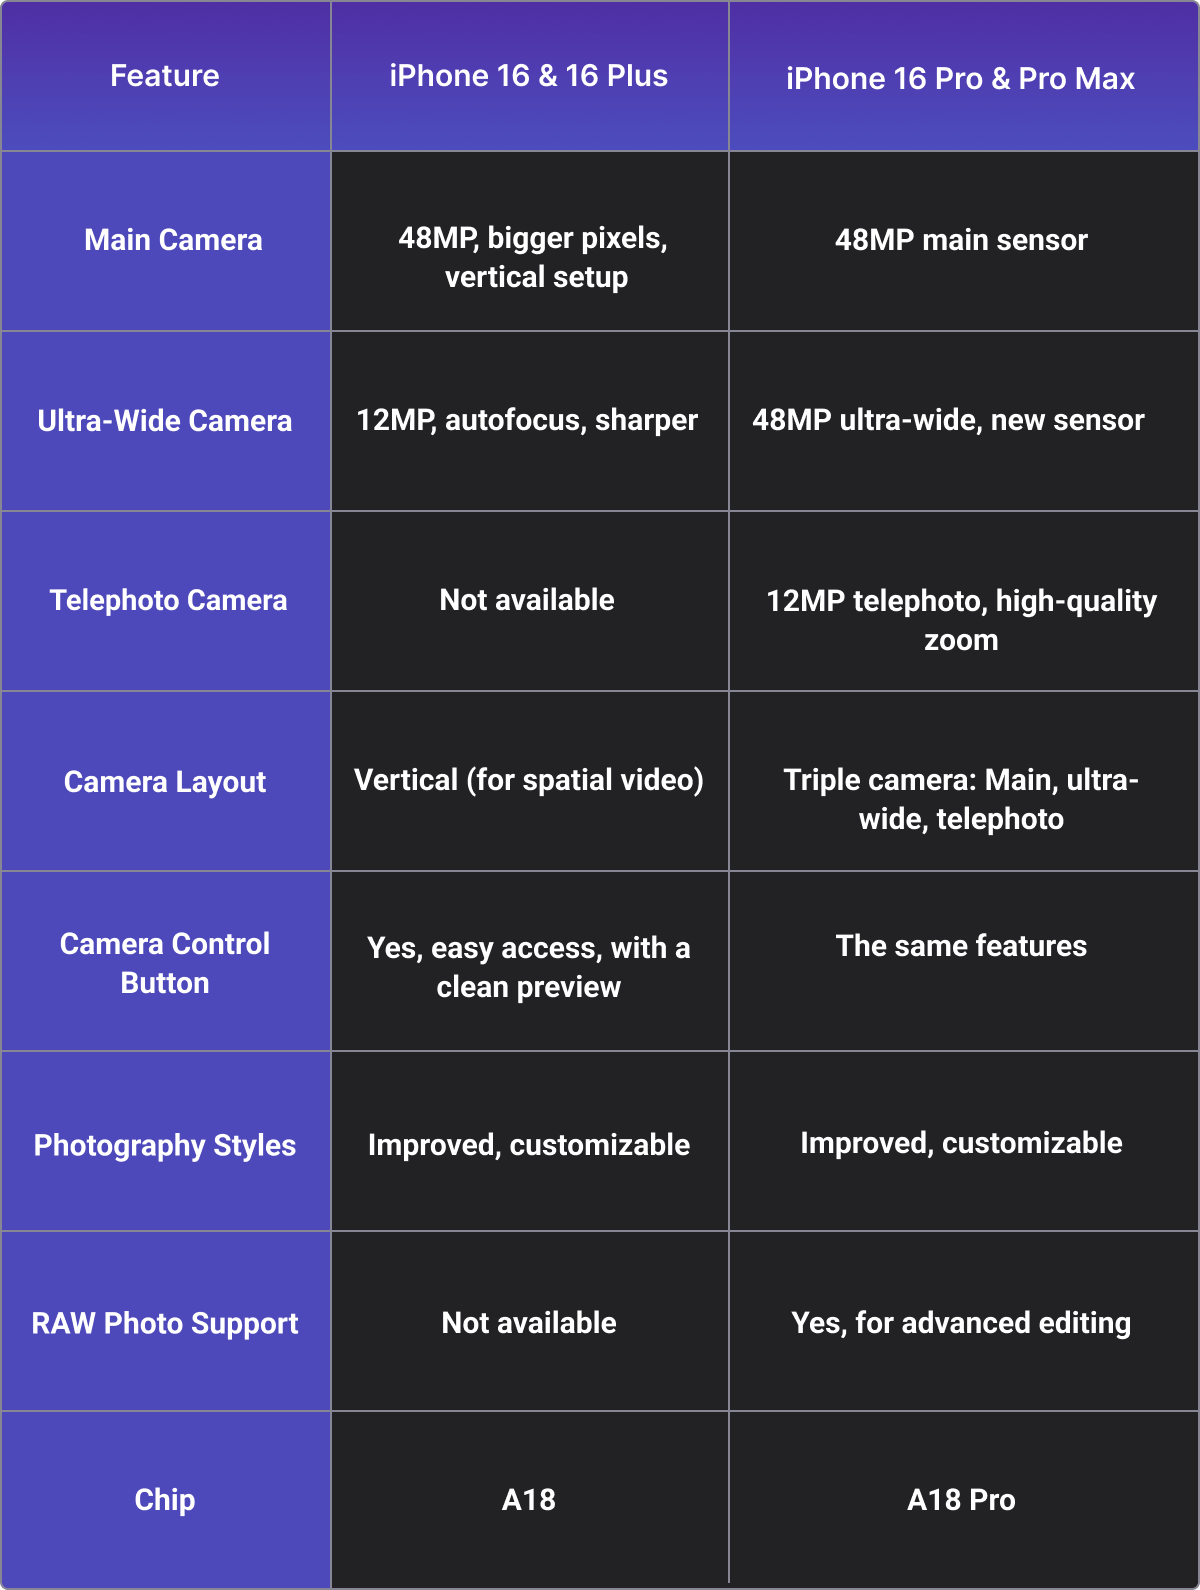
The iPhone 16 lineup shakes things up with some neat camera upgrades on both the regular and Pro models. The iPhone 16 and 16 Plus pack a 48MP main camera with bigger pixels for sharper shots, plus a sharper 12MP ultra-wide lens that can focus on its own.
Apple has switched the cameras to a vertical setup, which is handy for wide shots; perfect if you’re trying to show off a spacious living room or a stunning kitchen.
The two Pro models take it up a notch with a triple-camera setup: A 48MP main sensor, a fresh 48MP ultra-wide, and a 12MP telephoto lens for close-up details, like fancy fixtures or unique tile work.
Plus, there’s this handy Camera Control button that makes snapping photos a breeze. Just press, hold, or swipe, and you can even clear the screen so nothing gets in the way of your shot.
Let’s take a closer look at the iPhone 16’s camera features.
Shooting Properties with the iPhone 16
If and when you decide to use the iPhone 16 in real estate photography, your settings and approach should adapt to interiors or exteriors.
For both, it’s smart to head into your iPhone’s camera settings and make sure Smart HDR is turned on. This helps balance out bright windows and darker corners, which is a lifesaver for tricky interior shots where sunlight pours in but the room itself looks dim. If you’re interested, we suggest you read more on HDR in real estate photography.
For interiors, you may want to use the ultra-wide lens to make rooms look more spacious. But don’t go overboard. Too wide an angle can make things look warped. Turn on the camera grid in settings to help keep your lines straight, especially for walls and door frames, so your photos look professional and not wonky. Tap to focus on the main area you want to highlight and use the exposure slider to brighten up dark spots without blowing out the windows.
Specifically for exteriors, early morning or late afternoon is perfect for softer, more flattering light. Use the main 48MP camera for crisp detail, and tap to focus on the house so it’s sharp and clear.
If you want to show off a big yard or garden, try the ultra-wide lens, but check your shot for distortion before snapping away. Always take a few photos from different angles and heights to find the most flattering view of the property.
iPhone 16 Photography Tips for Real Estate Agents

If you’ve decided to shoot your own listing with the iPhone 16, here are some straightforward tips to help you get the best shots without needing fancy gear or hours of editing:
- Turn on the grid: Activate the grid lines from camera settings. This simple step helps you keep your shots straight and balanced, especially for walls and door frames. No distorted angles here!
- Tap to focus and adjust exposure: Before using the iPhone 16 in real estate photography, tap on the main subject or area you want to highlight. Then, slide your finger up or down to brighten or darken the photo. This is a perfect option for tricky lighting situations.
- Use a tripod or stabilizer: To avoid blurry or tilted shots, especially indoors, use a tripod or even a simple phone stand. Keeping your phone steady makes a big difference in photo quality.
- Shoot from multiple angles: Don’t settle for just one shot. Move around the room, crouch down, or try higher angles to find the most suitable perspective.
- Experiment with styles: Employing the iPhone 16 in real estate photography lets you customize the photo’s tone and warmth. Try different styles to see what best matches the mood of the property.
- Consider night mode for dim rooms: If you’re shooting darker interiors or evening exteriors, Night Mode can brighten the scene without adding too much noise.
- Always, always clean your lens: It sounds basic, but a quick wipe of your camera lens can remove smudges and dust that blur your photos.
Post-processing Tips for Preparing Your Photos
Following the tips provided above, you should get pretty clean photos. This, however, does not mean you can attach them to your listing right away. Always double-check to make sure the are no blemishes or distracting elements that could take away from the property’s appeal.
Luckily, editing real estate photos is not as time-consuming as it used to be. With artificial intelligence, it only takes seconds to polish your photos.
For instance, if a room is cluttered, you can use AI HomeDesign’s item removal to get rid of unwanted items. If a room is too dark or there’s noise, use AI photo enhancement to brighten the image, reduce noise, and sharpen details for a clean, polished result.
Virtual staging is another necessary edit you should always consider as unfurnished rooms often appear cold and uninviting. Attaching two copies of each photo, one virtually staged and the other unfurnished, is a smart strategy that allows house hunters to compare the possibilities and better visualize how the space could be used.
The iPhone 16 for Perfect Property Photos
Using the iPhone 16 in real estate photography is a great idea, even if you’re not a pro photographer. With a little attention to camera settings, some smart shooting techniques, and a few quick edits, you can create listing photos that look sharp and inviting.
Remember, it’s not just about having the latest phone. It’s about using it thoughtfully to show each property in its best light. Give these tips a try, and you might be surprised at just how good your next set of photos turns out!

_ Top Picks for Every Budget")

")
