Real estate photo editing techniques can turn standard property photos into clearer, more balanced, and more market-ready listing visuals. Good cameras matter, but post-processing is often what corrects lighting problems, straightens perspective, removes small distractions, and helps each room look closer to how it feels in person.
Raw camera files rarely capture the full warmth, depth, or clarity of a finished listing image. Buyers often scan several properties quickly, so photos need to communicate space, condition, and atmosphere without visual friction. This guide breaks down the core editing techniques used in real estate photography, from exposure correction and color correction to perspective fixes, day-to-dusk editing, sky replacement, and virtual staging.
How Real Estate Photo Editing Can Influence Buyer Attention and Listing Performance
Most listings lose buyer attention before a showing is ever scheduled. The decision often starts on a phone screen, where buyers scroll through competing properties and decide within seconds whether a home deserves a closer look. The first image either creates enough clarity to earn a click or gets passed over.
Because most buyers begin their property search online, listing photos often act as the first impression of a property. Clean, balanced, professionally edited images can make rooms easier to read, reduce visual distractions, and help buyers understand the property more quickly. That does not guarantee a higher sale price or shorter time on market, but it can support stronger engagement at the top of the funnel.
Speed matters because buyer attention is limited. When photos are dark, distorted, cluttered, or visually inconsistent, buyers need more effort to understand the space. Strong editing reduces that friction. It helps the listing feel more credible, complete, and worth opening before the buyer moves to the next property.
Why Better Listing Photos Create a Competitive Advantage
Even when most buyers start online, many listings still use photos that are dark, distorted, cluttered, or visually inconsistent. That creates a practical opening for agents who treat listing visuals as part of the marketing strategy, not as a final upload step.
Real estate photo editing helps close the gap between what the camera captures and what buyers need to understand quickly: room size, light, layout, condition, and atmosphere. When competing listings look unfinished or uneven, clean and consistent visuals can make a property feel more credible before the buyer reads the description.
Editing works best when it starts with strong source images. For agents who want to improve the full workflow, from shooting rooms to preparing final listing visuals, these real estate photography tips are the next logical step.
HDR Blending vs. Flambient: Choosing the Right Interior Editing Method
Interior photos often fail in a predictable way: expose for the room and the windows look blown out; expose for the windows and the interior turns dark. HDR blending and flambient editing solve that problem in different ways, and the right choice depends on speed, lighting complexity, and how much color accuracy the listing needs.
How HDR Blending Works
HDR blending combines several bracketed exposures into one balanced image. Each frame captures a different light level, allowing the final photo to recover bright window detail while lifting darker areas inside the room.
This method is common in residential real estate photography because it is relatively fast, scalable, and easier to manage across a full property shoot. Tools such as Adobe Lightroom can merge exposures automatically, while Photoshop gives editors more manual control over the final blend.
How the Flambient Method Works
Flambient combines ambient light with flash exposure. The ambient image preserves the natural mood of the room, while the flash image helps correct color casts and produce cleaner, more neutral wall tones.
Editors usually blend these layers manually in Photoshop, often using masks to control where each exposure appears. The process takes longer than standard HDR blending, but it can produce more accurate colors, cleaner window views, and a more polished result in rooms with mixed lighting.
When to Use HDR or Flambient
HDR blending works well for faster turnaround jobs, simpler rooms, and standard residential listings where natural balance matters more than perfect color precision. It is usually enough when the room has manageable contrast and no major mixed-light problems.
Flambient is better for luxury listings, interiors with strong color casts, rooms with bright windows, and properties where the exterior view is part of the value. The difference may be subtle in a standard listing, but it becomes more important when wall color, material accuracy, or window detail can influence buyer perception.
Both workflows remain important in professional real estate photo editing, but they serve different needs. HDR prioritizes speed and efficiency. Flambient prioritizes control and color accuracy.
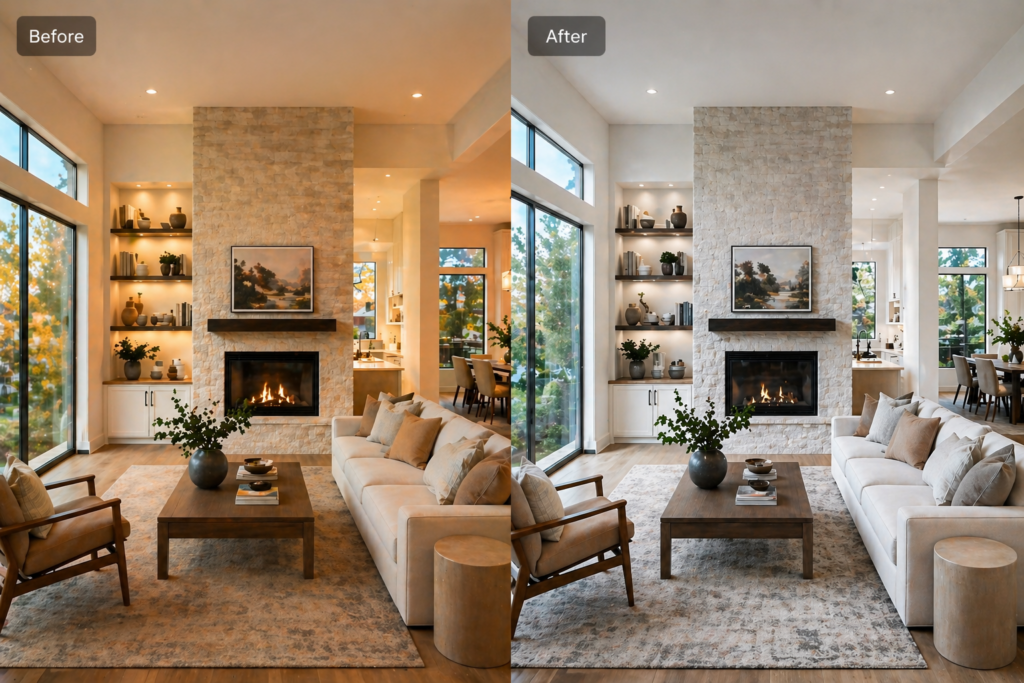
Color Correction and White Balance: The Baseline Every Listing Needs
Walk into a kitchen and the walls may look clean, soft white. Open the listing online, and those same walls can appear muddy yellow or overly blue. That mismatch makes the photo feel less accurate, even when the buyer cannot name the problem.
Mixed lighting is usually the cause. A kitchen may have warm recessed lights over the island and cooler daylight coming through a window. The camera records both color temperatures in one frame, so a single global white balance adjustment may not correct the whole room evenly.
How Color Correction Improves a Listing Photo
The first step is setting a neutral white balance using a surface that should appear white or gray, such as a cabinet, wall, or appliance. This removes the strongest color cast and gives the image a more accurate baseline.
From there, targeted adjustments can correct specific areas without making the room look cold or artificial. Warm wood cabinets should still feel warm. Natural daylight should still feel natural. The goal is not to make every surface perfectly white; it is to make the room look believable and consistent.
This is where careful editing matters more than simple auto-adjustment. Automatic filters often brighten the image but can flatten the natural warmth of an interior or push colors too far. Skilled real estate photo editing keeps the space clear, balanced, and visually honest.
Keeping Color Consistent Across the Listing Set
A single corrected photo is not enough. Buyers scroll through the full listing, and mismatched color temperatures between rooms can make the property feel visually uneven.
After correcting the main image, the rest of the listing set should be adjusted for consistency. Similar rooms can share a baseline, but each space still needs individual review. Bathrooms, kitchens, bedrooms, and living rooms often have different light sources, surface colors, and exposure problems.
The same pass should also cover exposure, contrast, highlights, and shadows. These adjustments affect how color is perceived. A window that is too bright can hide a color cast, while a shadow that is too dark can make wall colors look heavier than they are. Handling these corrections together creates a cleaner and more consistent final gallery.
Perspective Correction and Lens Distortion: Keeping Rooms Looking Natural
A bedroom shot can look composed through the viewfinder, yet feel slightly off in the final image. Uncorrected vertical lines can make walls appear to lean inward, while lens distortion can bend straight architectural lines near the edges of the frame. The result may be subtle, but it can make the room feel less stable and less natural.
Wide-angle lenses are common in real estate photography because they help capture more of the room in one frame. But they can also introduce distortion, especially when used too close to walls, door frames, or furniture. That is why choosing the best lens for real estate photography matters before editing even begins.
The Standard Fix
Perspective correction straightens vertical lines so walls, doors, cabinets, and windows look more natural. Lens correction reduces curved edges caused by wide-angle distortion. Together, these adjustments help the photo feel cleaner without making the room look stretched or artificial.
Most professional editing workflows handle these corrections early, before color grading, contrast work, or final sharpening. If the structure of the room looks distorted, later edits will not fully solve the problem. A balanced real estate image starts with geometry that feels believable.
Day-to-Dusk Conversion: Turning Exterior Photos Into Stronger Hero Images

Most exterior photos taken on overcast afternoons share the same problem: a flat sky, dull windows, and landscaping that looks washed out. The property may be attractive in person, but the image can feel quiet or forgettable in a crowded listing feed.
Day-to-dusk editing changes the atmosphere of a daytime exterior photo by creating a twilight-style version of the same property.
A strong conversion usually adds a deeper blue sky, warmer window light, softer exterior contrast, and richer but believable landscaping tones. The goal is to make the hero image more inviting without changing the property itself.
This technique is especially useful for luxury homes, waterfront properties, architecturally distinctive houses, and listings where the exterior is part of the selling point.
It can help the main listing image feel more polished and emotionally engaging, but it should not be treated as a guarantee of more views, showings, or offers.
What the Workflow Involves
A professional day-to-dusk conversion usually starts with replacing or adjusting the sky to create a blue-hour atmosphere. Then, visible windows are given a warm interior glow to suggest evening light.
The facade, shadows, driveway, lawn, and landscaping are adjusted so the scene still feels natural rather than artificially dark.
Manual editing gives the most control, especially for complex rooflines, trees, reflections, and irregular window shapes. AI-powered day-to-dusk tools can speed up the process and make the technique easier to use, but automated results may still need review when the exterior has detailed edges or unusual lighting.
The Ethical Boundary
Day-to-dusk editing should enhance the atmosphere, not change the property. The conversion should preserve the actual exterior, including structural features, permanent fixtures, visible additions, and material details.
A daytime photo of a home can reasonably become a twilight-style image with warmer windows and a richer sky. But adding architectural features, removing visible defects, hiding permanent fixtures, or changing the condition of the property can become misleading. The edit should improve presentation while keeping the listing visually honest.
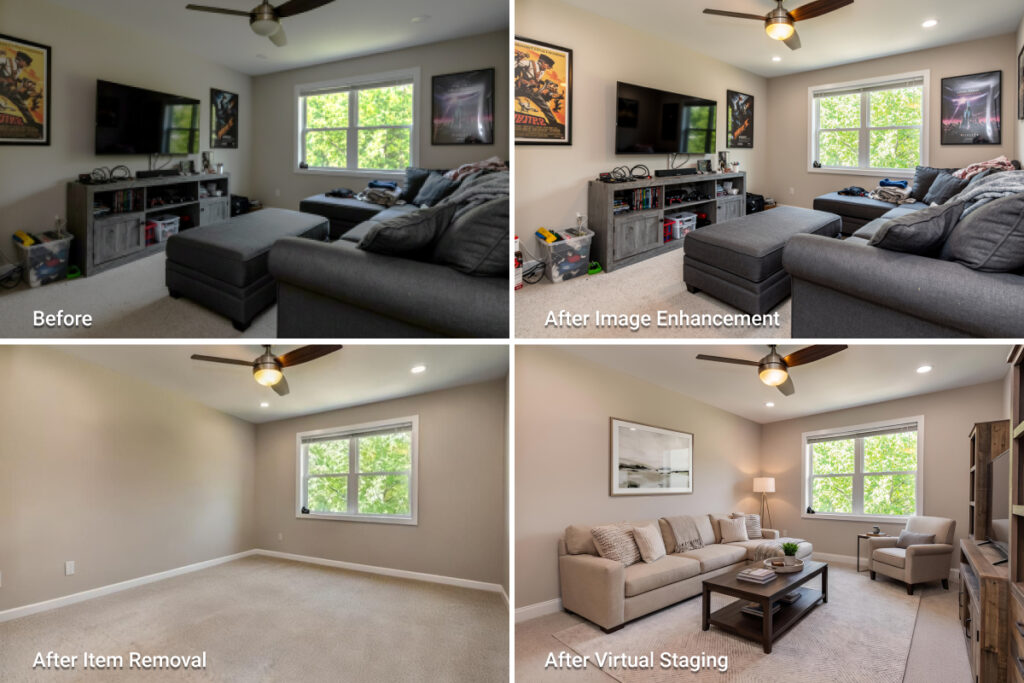
Virtual Staging and Digital Decluttering: When AI Editing Works Best
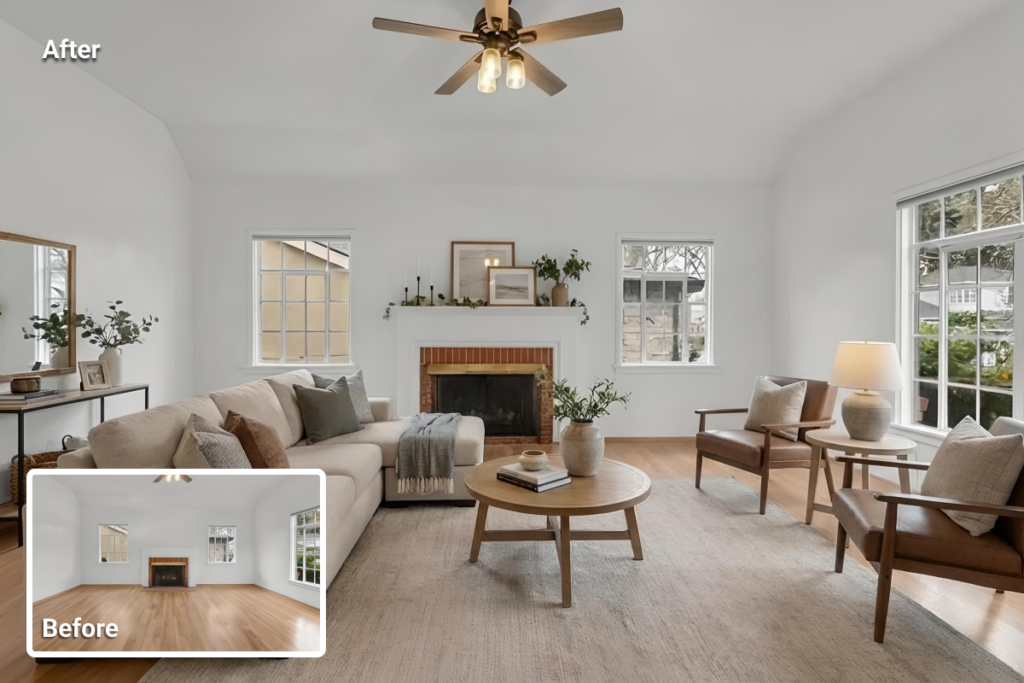
Vacant rooms can be difficult to read online. Without furniture, buyers may struggle to understand scale, layout, and how the space could function. Virtual staging helps by adding digital furniture and decor so the room feels more complete while still showing the actual architecture.
For example, a vacant living room with bare hardwood floors and white walls may feel cold or hard to imagine. Adding a sofa, rug, side table, and floor lamp digitally can help buyers understand the room’s purpose and proportions. The goal is not to disguise the property, but to give visual context to an otherwise empty space.
Digital Decluttering: When to Use AI and When to Use Manual Editing
Digital decluttering removes visual distractions such as loose cords, small personal items, countertop clutter, or minor temporary objects. For simple removals, AI tools can handle the task quickly and at low cost. For complex edits, such as removing large furniture, fixing reflections, or reconstructing detailed backgrounds, manual editing may produce cleaner and more reliable results.
Other common enhancements include TV screen replacement and fireplace fire addition, but these should be used carefully. They can add warmth to a listing image, but they should not imply a feature, view, or condition that does not exist.
MLS Ethical Guidelines: What Can and Cannot Be Edited
Listing photo edits should improve presentation without changing the property buyers will see in person. When edits hide important conditions, remove permanent features, or create a false impression of the home, they can create compliance risks and damage buyer trust.
Rules vary by MLS, brokerage, and local regulation, so agents should treat photo editing as both a marketing step and a compliance checkpoint. The safest standard is simple: enhance the image, but do not misrepresent the property.
What Editing Is Usually Acceptable
Basic corrections are generally part of standard listing preparation. These include exposure adjustment, color correction, white balance, perspective correction, lens correction, and minor sharpening.
Some presentation edits may also be acceptable when they do not change the property itself. For example, removing temporary clutter, loose cords, trash bins, or personal items can reduce distractions while keeping the property accurate.
Sky replacement and day-to-dusk editing require more caution. They may be acceptable in many listing contexts, but the edit should not hide defects, alter the surroundings, or imply a view, condition, or feature that does not exist.
Virtual staging belongs in a separate category because it adds visual content to the image. It should be clearly disclosed wherever required by MLS rules, platform policies, brokerage standards, or local law.
What Editing Should Be Avoided
Edits become problematic when they change material facts about the property. Removing permanent fixtures, visible damage, neighboring structures, utility elements, easements, power lines, water towers, or structural problems can mislead buyers.
Adding features that do not exist is also outside the ethical boundary. A pool, finished deck, fireplace, upgraded flooring, new landscaping, or improved view should not be created digitally unless it is clearly presented as a design concept rather than an actual listing image.
A useful test is this: would the buyer feel misled when they arrive at the property? If the answer is yes, the edit should not be used in the listing gallery.
Before publishing, agents should review edited images against local MLS rules and brokerage standards. Preparing real estate photos for MLS is not only a quality-control step; it is also a disclosure and accuracy check.
Best Tools for Real Estate Photo Editing Workflows
Adobe Lightroom is still one of the most common tools for baseline listing-photo corrections. It is useful for batch edits such as exposure adjustment, white balance, color correction, HDR merging, lens correction, and perspective fixes across a full property gallery. Its non-destructive workflow also makes it easier to keep images visually consistent from room to room.
Adobe Photoshop is better suited for heavier edits. Flambient blending, complex object removal, detailed sky replacement, reflection cleanup, and advanced retouching usually require the control of a layer-based editing environment. In many professional workflows, Lightroom handles the baseline corrections first, while Photoshop is used for image-specific fixes.
AI-Powered Platforms
AI-powered real estate photo editing platforms are useful for tasks that agents need to complete quickly, such as virtual staging, day-to-dusk conversion, image enhancement, and object removal. These tools reduce the need for advanced editing skills and can make listing preparation faster, especially when turnaround time matters.
Generative AI in real estate photography is also expanding what these platforms can do. Instead of only correcting an image, AI tools can now add furniture, adjust atmosphere, remove temporary objects, or generate staged versions of vacant rooms from a single photo. These features are useful, but every output still needs human review for realism, accuracy, and compliance.
Budget-Friendly Options
Agents working with smaller budgets can still improve listing photos with mobile tools such as Lightroom Mobile or Snapseed. These apps can handle basic exposure, color, cropping, and perspective adjustments directly on a phone.
For more advanced needs, such as virtual staging or day-to-dusk editing, AI-only platforms can fill the gap without requiring a full desktop editing setup. The best choice depends on the task: mobile apps help with basic corrections, Lightroom and Photoshop support professional editing control, and AI tools are strongest for speed, staging, and automated enhancements.
DIY vs. Outsourcing: When to Edit In-House and When to Use a Service
The question is not whether listing photos need editing. It is whether editing them in-house is the best use of time, skill, and budget. The right choice depends on listing volume, turnaround needs, editing complexity, and the quality standard expected for the property.
When DIY Editing Makes Sense
DIY editing can work for agents or small teams with solid Lightroom experience and a manageable listing volume. Basic corrections such as exposure adjustment, white balance, color correction, cropping, and perspective fixes can often be handled in-house when the source photos are already strong.
This approach gives agents more creative control and can reduce costs. But it only works when editing does not delay the listing, lower image quality, or pull too much time away from client work.
When to Outsource
Outsourcing makes more sense when the listing volume is high, the deadline is tight, or the edits require advanced technical control. Complex object removal, flambient blending, sky replacement, window-pull correction, and high-end retouching usually demand more than basic presets.
Luxury listings also raise the standard. Sellers expect polished visuals, and buyers may pay closer attention to material accuracy, window views, lighting, and architectural details. In those cases, professional editing support can protect both quality and turnaround time.
The AI-Assisted Middle Path
AI editing tools now sit between DIY editing and full manual outsourcing. They are useful for agents who need faster results but do not have advanced editing skills or a large editing budget.
AI tools can help with virtual staging, day-to-dusk conversion, image enhancement, and object removal. A platform like AI HomeDesign fits this middle path because it helps agents prepare listing visuals quickly without building a full Photoshop workflow.
This option works best when the edits are presentation-focused and still reviewed for realism, accuracy, and compliance before publishing.
Diy edit and ai edit/ photo
Comparing the Trade-Offs
| Approach | Time Cost | Financial Cost | Quality Consistency |
|---|---|---|---|
| DIY Editing | High | Low | Variable |
| Professional Service | Low | Higher per set | High |
| AI-Assisted Tools | Low | Low to moderate | Consistent within the same platform |
Consistency across a listing set is often the strongest argument for outsourcing or using one clear editing workflow.
A gallery with mixed editing styles, where some rooms look warm, others look cool, and exposure shifts from image to image, can make the listing feel less polished.
Whether the choice is a professional service, an AI-assisted platform, or an in-house workflow, every image in the set should feel visually unified. Consistent color, brightness, perspective, and contrast matter as much as any individual edit.
Final Thought
Photo editing is not just a finishing touch. It is part of how a listing is prepared, understood, and judged online. Clean lighting, accurate color, straight verticals, and consistent image quality help buyers read the property faster and with less visual friction.
Different listings need different levels of editing. Some only need baseline corrections such as exposure, white balance, and perspective fixes.
Others benefit from HDR blending, flambient editing, day-to-dusk conversion, digital decluttering, or virtual staging. The right choice depends on the property, the source photos, the deadline, and the level of presentation expected by the market.
The ethical line should stay clear: editing can improve presentation, but it should not misrepresent the property. Permanent features, visible damage, material conditions, and structural details should remain accurate.
When staging or more advanced edits are used, disclosure should follow local MLS rules, brokerage standards, and applicable regulations.
The strongest results come from treating editing as a disciplined workflow rather than a last-minute fix. Whether the work happens in-house, through a professional editor, or with AI-powered tools, the goal is the same: a clear, consistent, and trustworthy listing gallery.
Can AI-edited day-to-dusk or staged photos go on the MLS without disclosure?
MLS rules vary, so agents should check their local board’s media policy before publishing edited images. Virtual staging usually needs clear disclosure where required, and day-to-dusk images may also need labeling if they materially alter the appearance of the photo. Safe labels include “virtually staged” or “digitally enhanced exterior.”
Does photo editing help all price points?
Yes, but the level of editing should match the listing. Entry-level and mid-market homes usually need clean baseline edits such as exposure correction, white balance, and perspective fixes. Luxury listings may need more advanced work, including flambient editing, window pulls, twilight images, or detailed retouching.
How many listing photos need advanced editing like flambient or HDR?
HDR or flambient editing matters most for rooms with strong contrast, especially kitchens, living rooms, and primary bedrooms with large windows. Secondary rooms, exterior shots, and detail photos may only need basic exposure, color, and perspective correction. Full advanced editing on every photo is rarely necessary.
What is the minimum editing a smartphone listing photo needs?
A smartphone listing photo should at least have perspective correction, white balance adjustment, exposure correction, and basic cropping. These fixes help straighten walls, reduce color casts, recover shadows, and make the image look cleaner in an online listing gallery.
How can agents keep color consistent when outsourcing editing?
Agents should provide one approved reference image from the listing set. That gives the editor a clear target for brightness, white balance, contrast, and overall tone. A short style brief also helps, especially if the gallery should feel warm, neutral, bright, or more natural.