A strong real estate photo editing workflow usually follows a clear sequence: enhance the image, remove distractions, add virtual staging, then polish the final result. Each step prepares the photo for the next one.
Getting the order wrong can create visible problems. A poorly exposed base image can make staged furniture look flat or muddy. Clutter left in place before staging can confuse the layout and make the final image feel crowded. If the last polish happens too early, later edits may break the lighting, shadows, or color balance.
The right sequence helps agents, photographers, and editing teams avoid rework. It also keeps the final image cleaner, more realistic, and easier for buyers to trust.
Why Sequence Matters: How Each Step Depends on the One Before It
Jumping straight to virtual staging before correcting the photo can create visible problems. Staging tools work from the image they receive. If the room is too dark, overly yellow, tilted, or visually cluttered, the staged furniture may look less realistic.
Each step depends on the quality of the previous one. Enhancement comes first because it creates a cleaner base. Correcting exposure, white balance, contrast, and perspective gives the next tools a more stable image to work with.
Item removal works better after that cleanup. When the image has balanced light and consistent color, removed objects can be filled more naturally. Once clutter, cords, personal items, or unwanted furniture are gone, virtual staging has a cleaner room to interpret.
The final polish should come last. After enhancement, removal, and staging are complete, the image may still need small adjustments to shadows, color, sharpness, or overall consistency. That last pass helps the finished photo feel like one unified image, not a set of separate edits.
A practical real estate photo editing. real estate photo editing workflow should follow this order:
Enhance → Remove → Stage → Polish
That sequence reduces rework and helps the final image look cleaner, more realistic, and more trustworthy.
Step 1: Global Image Enhancement Sets the Lighting and Geometry Baseline
Global image enhancement should come first because it gives every later edit a cleaner base. This step covers exposure, white balance, contrast, perspective correction, and lens distortion.
If the base photo is too dark, too warm, tilted, or distorted, later edits become harder to blend. Staged furniture may look less realistic. Removed objects may leave patchy fills. Shadows and colors may feel inconsistent across the room.
Correcting the image first reduces those problems. A bright, balanced, and straightened photo gives item removal and virtual staging tools a better starting point.
AI Batch Enhancement vs. Manual Photoshop for This Step
For standard residential shoots, AI batch enhancement can handle many basic corrections quickly. It works well for exposure, contrast, white balance, and simple consistency across a photo set.
Manual editing is still useful for more complex images. Luxury listings, difficult lighting, flambient blending, detailed retouching, or day-to-dusk conversions may need more control than an automated pass can provide.
A practical enhancement checklist should include:
- Exposure and contrast correction
- White balance adjustment
- Perspective and vertical line alignment
- Lens distortion correction
Completing these edits before item removal or staging keeps the workflow cleaner and reduces rework later.
Step 2: AI Item Removal and Decluttering Clears the Canvas
A corrected image gives AI item removal tools a cleaner surface to work with. When exposure, color, and perspective are already balanced, removed objects are easier to blend into the background. Skipping enhancement first can leave muddy fills, patchy textures, or mismatched tones that make the edit obvious.
The Ethical Boundary Every Editor Must Respect
A clear line separates helpful cleanup from misleading editing. Temporary objects such as power cords, recycling bins, dish racks, loose shoes, personal items, or staging equipment can usually be removed because they do not change the property itself.
Permanent fixtures, visible damage, and structural details should stay. Erasing a water-stained ceiling, cracked baseboard, damaged flooring, or view obstruction can misrepresent the property and create compliance risk.
Many questions around virtual staging legality come back to this distinction: editing should improve presentation, not change what the buyer or renter is actually getting.
A decluttered room is also a better input for virtual staging. With distractions removed, the staging tool can read the layout more clearly and place furniture in a way that feels more natural.
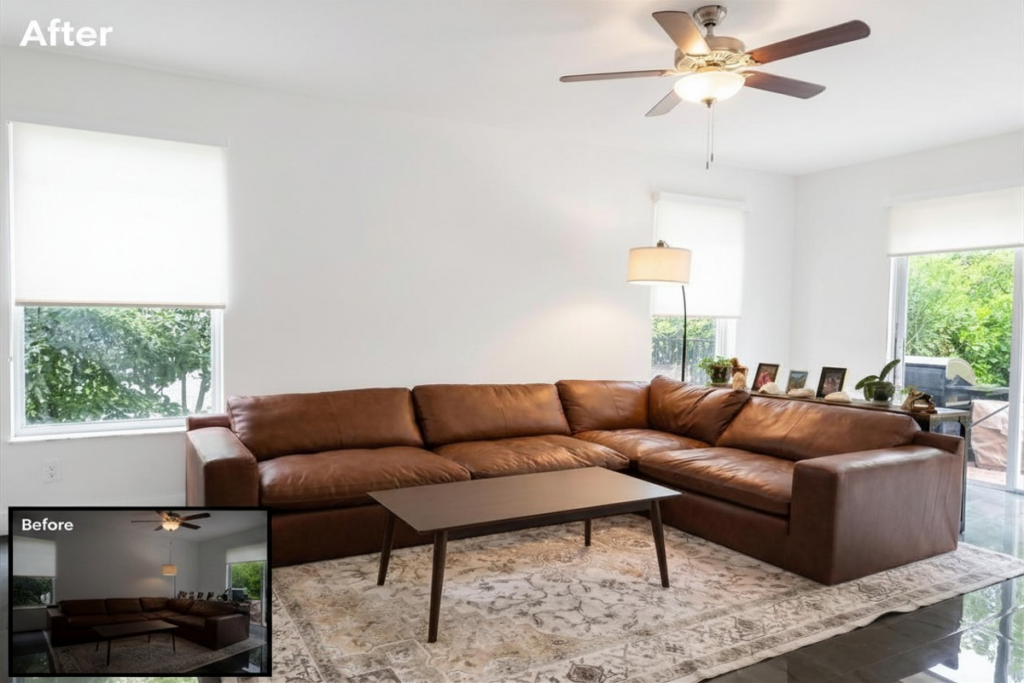
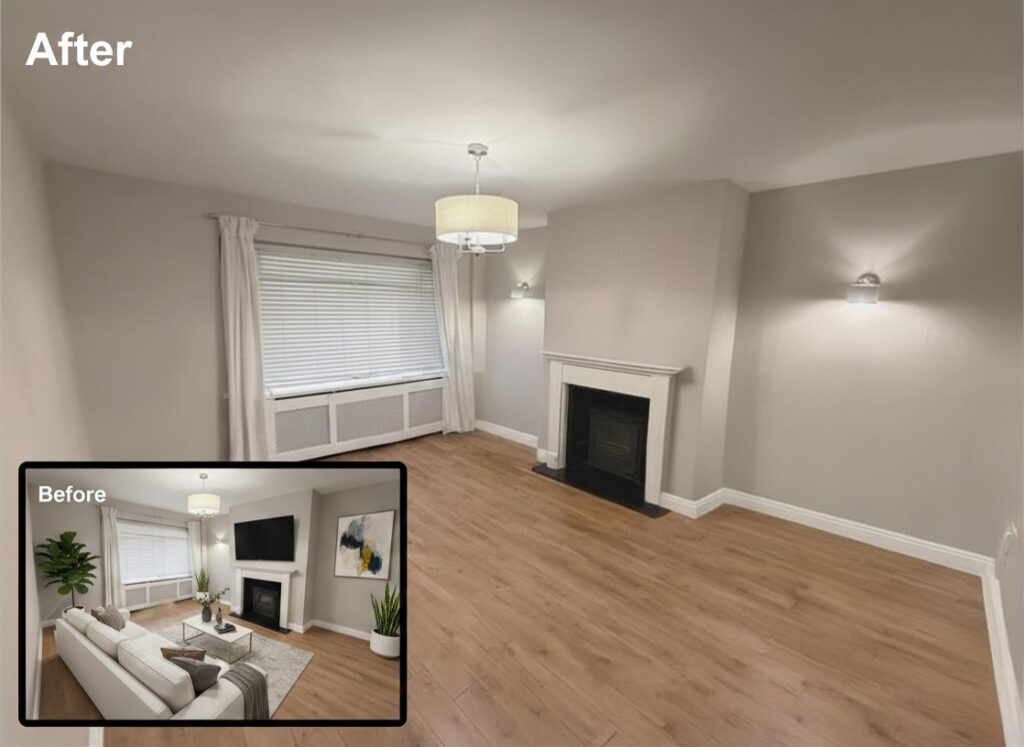
Step 3: AI Virtual Staging Furnishes a Corrected, Vacant Space
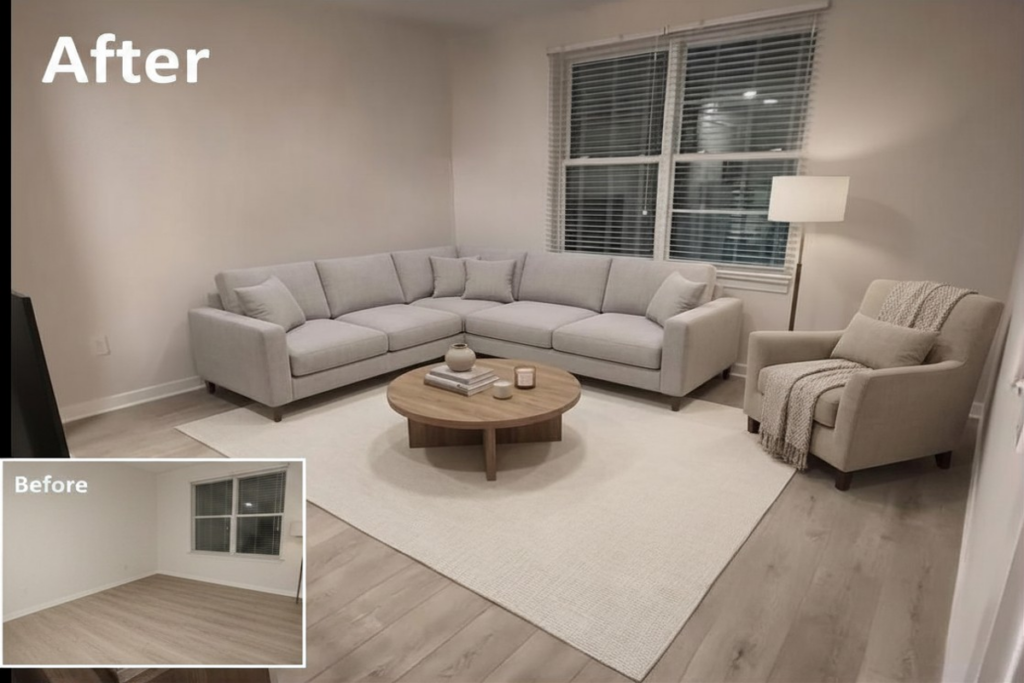
Virtual staging works best when the room is already clean, bright, and empty. If the image is too dark, tilted, or cluttered, the furniture may look less realistic. Common problems include floating furniture, weak shadows, and incorrect scale.
That is why steps one and two matter so much. When exposure, white balance, and perspective are already corrected, and the room has been decluttered, the staging result usually looks more natural. The furniture fits the space better, and the final image feels more believable.
AI virtual staging performs best on vacant, well-lit rooms with a clear floor area. A clean space gives the tool a better view of the layout and makes furniture placement easier to control. Platforms such as AI HomeDesign and REimagineHome can then generate furnished versions of the room much faster than physical staging workflows.
Another benefit is flexibility. Agents can test different design directions for the same room, such as modern, traditional, or luxury styling, and then choose the one that best fits the property and buyer profile.
The speed matters, but realism matters more. Virtual staging works best when it helps buyers understand the space clearly, not when it draws attention to the edit itself.
Step 4: Final Polish and Manual Refinement

Many standard listing photos do not need heavy manual retouching. AI editing tools can handle common corrections such as exposure, color balance, perspective alignment, basic cleanup, and virtual staging. Still, the final image should always be reviewed before it goes live.
Manual refinement becomes more important when the image is complex or the listing has higher presentation demands. Luxury homes, difficult lighting, flambient blends, detailed exterior edits, and day-to-dusk conversions may need a human editor to make the result feel seamless.
The final polish should focus on consistency. Shadows should match. Furniture should sit naturally on the floor. Colors should feel realistic across the full photo set. Walls, floors, windows, and permanent features should still match the original property.
Before publishing, compare the edited image with the original photo side by side. This quality-control step helps catch floating furniture, unnatural color casts, patchy object removal, or edits that may misrepresent the space. It protects the agent’s credibility and helps buyers trust what they see.
The "Enhance First" Mental Model: A Decision Framework for Every Listing Type
The easiest way to remember the workflow is:
Normalize → Clear → Furnish → Verify
In plain terms:
- Normalize the photo with enhancement.
- Clear distractions with item removal.
- Furnish the space with virtual staging.
- Verify the final image before publishing.
This order prevents common editing problems. If staging happens before cleanup, clutter can interfere with the room layout. If furniture is added before lighting and perspective are corrected, shadows and scale may look wrong. If the final review happens too early, it misses the edits that matter most.
Inputs That Shape Each Gate
The same sequence can apply to many listing types, but the decisions inside each step should change. A vacant starter condo, an occupied family home, and a luxury townhouse do not need the same editing depth.
Before editing, agents and editors should look at four inputs:
- Listing price point
- Vacancy status
- Launch timeline
- Target buyer
A vacant entry-level condo may need simple enhancement and basic staging. An occupied luxury townhouse may need careful item removal, manual refinement, and a stricter final review. The order stays the same, but the level of care changes.
Use the Framework Before and After the Shoot
This framework also works before the photographer arrives. Before the shoot, the agent can ask:
- What needs to be cleared physically?
- Which rooms may need virtual staging?
- Are lighting or clutter issues likely to slow down editing?
- Which images will need the most careful review?
After the shoot, the editor follows the same logic in order. Enhance first. Remove distractions. Stage only after the room is ready. Then compare the final image with the original before publishing.
That makes the workflow easier to repeat across vacant homes, occupied listings, and partially furnished rooms.
Speed, Cost, and Quality Trade-Offs: AI Workflow vs. Manual Photoshop Heading Text Here
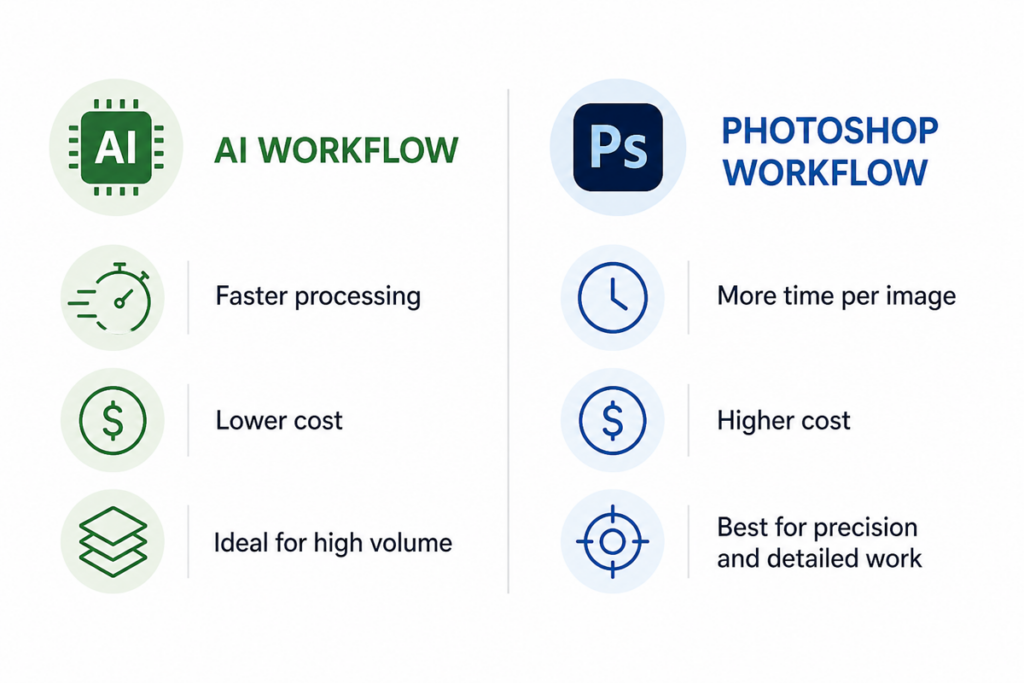
Real estate editing workflows often slow down because of image volume. When a team needs to process many listings in a short time, the difference between AI in real estate workflows and manual Photoshop work becomes more important.
Speed and Cost at Scale
AI tools can speed up common editing tasks such as exposure correction, white balance, decluttering, and basic enhancement. That makes them useful when a brokerage or editing team needs fast turnaround across a large photo set.
Manual Photoshop work usually takes longer because each image needs more direct attention. It can also cost more when the workflow depends on detailed retouching or outsourced editing. At scale, those time and cost differences can affect how quickly a team prepares listings each week.
Where Each Approach Earns Its Place
AI works well for many standard listing photos. It can handle routine corrections, basic cleanup, and some staging tasks with much less manual effort.
Photoshop remains stronger when the image needs more control. Luxury listings, complex composites, flambient blending, and careful day-to-dusk work often benefit from manual refinement. In those cases, the goal is not just speed. It is precision.
The Hybrid Model
For many teams, the best approach is a hybrid one. AI can handle the bulk of standard edits, while selected images go through manual refinement when the listing needs a higher presentation standard.
This is also where virtual staging cost and roi becomes relevant. Teams need to decide when a fast, lower-cost workflow is enough and when a premium image deserves more time and manual attention.
Some platforms now combine enhancement, item removal, and staging in one workflow. That can simplify the editing process by reducing handoffs between separate tools.
When the Standard Workflow Doesn't Fit: Red Flags and Edge Cases
Not every listing fits the standard four-step workflow.
Occupied homes are the first exception. If furniture already fills the room, heavy virtual staging may confuse buyers or make the space feel misrepresented. Light cleanup may be fine. Temporary clutter, loose cords, or small personal items can often be removed. Permanent fixtures, visible damage, and structural details should stay.
Luxury listings are another exception. AI staging has improved, but some high-end properties still need more manual control. This is where comparisons between virtual staging vs traditional staging matter most: a premium listing may need careful compositing, detailed retouching, or a more restrained editing approach to meet buyer expectations.
Unique architecture can also create problems. Curved walls, dramatic skylights, unusual room shapes, or strong mixed lighting can make AI edits less reliable. In those cases, a lighter workflow is often safer. Start with exposure correction, white balance, and perspective fixes. Then decide whether the image can support item removal or staging without looking forced.
The key is judgment. The standard workflow works well for many listings, but it should not be applied mechanically. When the room, property type, or marketing standard makes realism harder to protect, a simpler edit may be the better choice.
Applying the Workflow: A Practical Checklist for Agents and Photographers
A clear checklist helps agents and photographers avoid rework. The goal is simple: prepare the room first, correct the image, remove distractions, stage only when the space is ready, then review the final result before publishing.
Pre-Shoot Check
Before the photographer arrives, confirm the room’s condition. Is it vacant, occupied, or partly furnished? Check natural light, visible clutter, cords, bins, personal items, and anything that can be removed physically.
AI item removal can help, but it should not replace basic preparation. The cleaner the room is before the shoot, the easier the editing workflow becomes.
Enhancement Check
After import, correct the basics first:
- Exposure
- White balance
- Contrast
- Perspective
- Vertical lines
- Lens distortion
This creates a cleaner base for item removal and virtual staging. If the image is too dark, too warm, or tilted, later edits become harder to blend.
Item Removal Check
Before removing anything, decide whether the object is temporary or permanent.
Temporary items may include cords, bins, loose shoes, personal items, staging props, or cleaning supplies. Permanent fixtures, structural details, visible damage, and property features should stay. Removing them can mislead buyers and create compliance risk.
Staging Check
Use virtual staging only when the room is vacant, near-vacant, or suitable for digital furnishing. Then choose a style that matches the property, price point, and target buyer.
Testing two or three style options can be useful, especially for agents doing diy virtual staging with ai. The goal is not to choose the most dramatic version. The goal is to choose the version that makes the space feel clear, realistic, and market-appropriate.
Final Polish and Disclosure Check
Compare the edited image with the original before publishing. Look for furniture scale, shadow direction, color consistency, patchy removal, distorted textures, or anything that makes the image feel fake.
Virtually staged images should be labeled wherever MLS rules, platform policies, brokerage guidance, or local law require it. Even when the rule is not explicit, clear disclosure helps protect buyer trust.
Final Thought
The best real estate photo editing workflow follows a simple order:
Enhance → Remove → Stage → Polish
This sequence is not just a preference. Each step prepares the image for the next one. Enhancement creates a cleaner base. Item removal clears distractions. Virtual staging works best once the room is corrected and uncluttered. Final polish checks whether the edited image still feels realistic.
For most standard listings, a hybrid workflow makes sense. AI can handle many common tasks, including enhancement, basic cleanup, and virtual staging. Manual refinement should be reserved for images that need more control, such as luxury listings, complex edits, or day-to-dusk conversions.
Ethics matter as much as sequence. Removing temporary clutter is different from hiding permanent fixtures, damage, or structural issues. Teams should treat those categories separately and follow the disclosure rules set by their MLS, brokerage, platform, or local market.
When comparing editing and staging platforms, look beyond speed. The best workflow is the one that keeps the sequence clear, reduces handoffs, and makes quality control easier. Resources on virtual staging statistics can help teams compare cost, output quality, and adoption trends before changing their process.
The practical next step is simple: audit one recent listing against the four-step sequence. Find where the workflow skipped, reversed, or rushed a step. That gap is the fastest path to cleaner output and fewer revisions
FAQs
Can AI virtual staging work on a room that still has some furniture, or does it need to be completely vacant?
AI staging tools can process partially furnished rooms, but results are less predictable. The AI may blend existing furniture with generated pieces in ways that look inconsistent. For best output, removing remaining furniture, physically or through AI item removal first, gives the staging engine a clean, normalized space to work with.
If a unified platform combines enhancement, removal, and staging, does the order still matter?
The order still matters, even inside a unified platform. Most unified tools process steps sequentially under the hood, but some allow users to skip steps or apply them out of order. Checking the platform’s processing logic, and not assuming the tool enforces the correct sequence automatically, helps avoid shadow mismatches and fill errors in the final output.
What is the safest workflow when a seller refuses to remove personal items before photography?
Photograph the space as-is, then use AI item removal only on temporary, movable objects like cords, bins, and personal decor. Avoid removing items that reveal the home’s actual condition. Documenting what was digitally removed, and disclosing it if required by the local MLS, protects the agent from compliance risk if a buyer raises concerns after viewing the listing.
Does virtually staging a property require specific disclosure language in MLS listings?
Disclosure requirements for virtual staging vary by MLS board and state real estate commission. Many boards require a label such as “virtually staged” in the photo caption or listing remarks. Agents should check their specific MLS rules before publishing staged images, since non-disclosure in markets with explicit requirements can result in listing violations or complaints.